Four Simple Steps To Sous Vide


The holidays have been good to me so far. One of the most exciting things I received this year was an SV1 Sous Vide cooking immersion Circulator. I have been using my VacMaster® PRO380 for a while now, and it has become one of my most used kitchen appliances; this is why I was eager to add another VacMaster® to my kitchen and try out the sous vide cooking trend. Being new to this style of cooking I had asked for the Sous Vide Starter Kit, which came with the SV1 as well as a water tank for cooking in. I couldn't wait to bust it out of its packaging and start cooking right away. I decided to keep it simple for the first meal, and made my wife and I some melt in your mouth perfect steaks. I didn't need to go out and buy any special or specific cut of meat, sous vide works perfect for whatever you already have in the fridge or freezer.
1. Prepare and Season.
Presumably in preparation for this gift, my wife had some steaks in the fridge that she had asked me to cook this week. It gave me the perfect opportunity to play with my new toy. First I set the temperature on the SV1 to 150°, then I rubbed a little bit of our favorite pepper rub onto the steaks, making sure to cover both sides.
2. Vacuum and Seal.
Using our trusty PRO380 I sealed the steaks in a bag I had cut from a full mesh roll. The Unit will beep to let you know it has reached the set temperature, simply press play/start to stop this.
3. Submerge and Simmer.
I placed the sealed steak into the preheated water bath and let it cook for 45 minutes. The unit will beep when the time is up.
4. Finish and Enjoy.
Lastly to finish I briefly seared the steak on the grill, being sure to do both sides. That was it, dinner was done, and it was perfect! The steaks were juicy and not even the slightest bit over done, the grill gave just the right bit of "finish" to the outside while the inside remained tender.
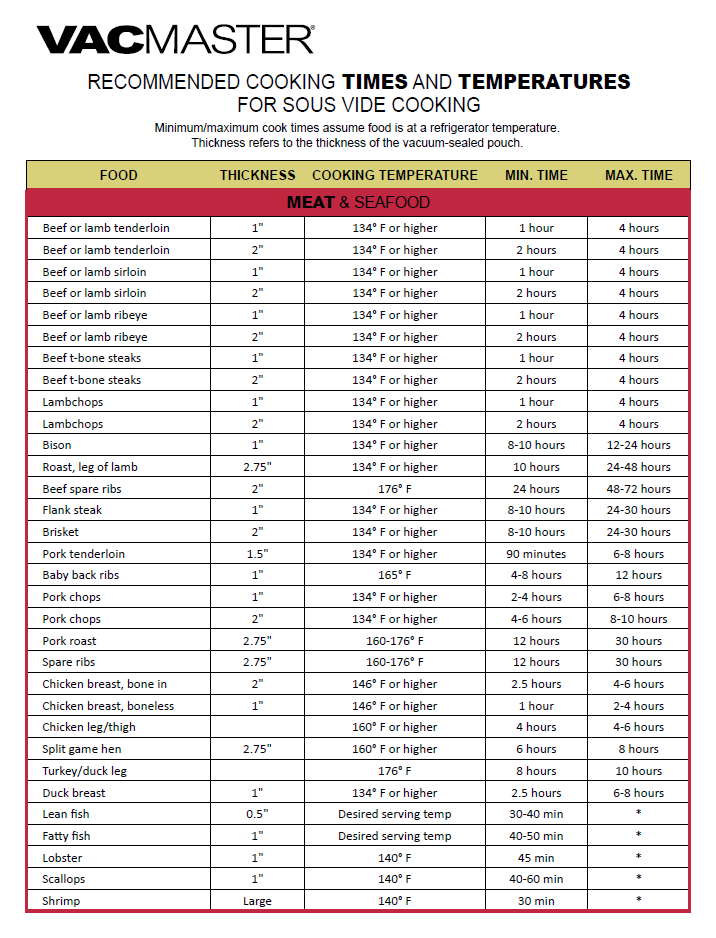
See the charts below for recommended cooking times and temperatures ↓


